OWASP Attack Surface Detector Project

When I did a short work stint at Secure Decisions in 2018, one of the projects I got to work on was helping to create the Attack Surface Detector plugin for ZAP and Burp Suite. I left that position before the project got published, but I am happy to see that it was a success.

Here it is in all its glory.

From the OWASP description:

The Attack Surface Detector tool uncovers the endpoints of a web application, the parameters these endpoints accept, and the data type of those parameters. This includes the unlinked endpoints a spider won’t find in client-side code, or optional parameters totally unused in client-side code. It also has the capability to calculate the changes in attack surface between two versions of an application.

There is a video that demonstrates the plugin, and yes, that is me doing the voice-over.

The InfoSec World Has a Python 2.7 Problem

Welcome to 2019, everyone! The future is bright, and I am sure we will all experience a lot of fun and unexpected things in the world of security. So far this year, we haven’t see anything along the lines of Specre/Meltdown, which helped usher in 2018.

One thing I did realize is that the turning of the calendar to this new year, remarkably, means that there is less than one year until Python 2.7 is officially “unsupported.”

Just check the Python 2.7 Countdown clock if you don’t believe me. Everything should be well on the way to Python 3 by now. Or so you would hope.

I find it somewhat humorous (mildly) that the infosec community still relies so heavily on Python 2.7, given its impending doom. I still see new tools being actively developed in this version of Python crossing my news feed almost daily. So many things on Kali Linux rely on Python 2.7.

I have oberved that longstanding, popular open source stalwarts of the trade have shown little interest in moving to 3.x.

I really have no idea what to do about this, other than encourage contributors to migrate, and to lend a hand if and where possible. But it’s getting really late, and I still have to use python2.7 far too much in my day-to-day pentesting and security research life.

How about a New Year Resolution?

Using IFTTT to connect Reddit to Discord

I spent far too long this morning trying to get posts from a particular subreddit to show up in a particular channel on a Discord server I belong to. There was a lot of bad and wrong information out there on how to do this, and finding the correct way took me down many incorrect pathways.

The goal here is to set up the workflow like this:

Reddit post in /r/yoursubreddit > IFTTT applet > Discord webhook > posted to your Discord channel

Essentially, the Discord webhook is a very simple Discord bot that is fed content by IFTTT when someone posts to the subreddit of interest. The webhook takes that content and feeds it to the channel you desire.

For the record, this is the way to do it.

Prerequisites

  • A sufficient user role to edit the channel settings on Discord of the channel you want to post your Reddit content to.
  • Webhooks capability enabled for your Discord user role *and* for the channel you want to use. See here for more info on how to enable Webhooks.
  • An If This Then That (IFTTT) account.
  • Optional: an image/icon for the webhook. This will show up for the account that will be posting the Reddit post to your Discord channel. I used this one.

The Setup

Let me preface this by saying that these instructions were created using the desktop version of Discord and a desktop web browser. It may be a little more tricky on mobile, and what you see may be a little different, but perhaps not.

Create a webhook for your Discord Channel.

1. Go to the Discord channel you want to use and click the gear icon to Edit Channel:


2. Click Webhooks in the left-side menu, then click the blue Create Webhook button on the right.

3. Give your webhook bot a name such as “Reddit post bot” and select the channel you are having it post to.

4. This is where you can optionally upload an icon for this bot. This will show up as the user icon when this bot posts to Discord.

5. Copy the Webhook URL, or keep it handy, so that you can paste it elsewhere in a few steps.

6. Click Save.

Create an IFTTT recipe

8. Open your IFTTT account, go to My Applets, then click New Applet.

9. Click the blue “+this” to add the first action.

10. Use “Search services” to search for Reddit, and choose the “Any new post in subreddit” trigger

11. For the “Subreddit” field, enter the subreddit you want to use without the “/r/” in front of it. For example:

12. Click Create Trigger.

13. Now you should see something like the following:


Click the “+that” link.

14. This time, under “Search services,” search for “webhooks.” Select the result and click “Make a web request.”

15. Now you can paste the Webhook URL you created in Step 5 above into the URL field here.

16. For “Method” choose POST and for Application Type choose “application/json”

17. Here’s the crucial part. Under “Body” copy and paste this entire line of json code exactly as-is EXCEPT, change YOUR BOT’S NAME to the name you want to give this bot (such as “Reddit Feed Bot” or “Fred”):

{ "username":"YOUR BOT'S NAME", "content":"I have received a new post!", "embeds":[{ "title" : "{{PostURL}}", "author": { "name": "'{{Title}}' by {{Author}}" }, "description" : "{{PostedAt}}", "url" : "{{PostURL}}" }] }

Optionally, you can change the “I have received a new post!” text to anything you want to show up any time there is a new post to Discord from this bot. Leave all the rest of the code as-is.

18. Click Save.

That’s it! Any new posts in the subreddit you chose should now show up in the Discord channel you chose. Keep in mind that it isn’t instant. It usually take about 15 to 30 minutes for new posts to show up for me, for whatever reason. If anyone knows how to speed that up, please feel free to post the solution in the comments section below.

Enjoy!

What Note Taking App is Best for PWK and OSCP?

A very common question in OSCP student chat rooms and channels I hang out in is “should I be using something other than Keepnote?”

It is a fair question considering Keepnote is recommended in the PWK course materials. However, you may notice that it hasn’t been updated in over 6 years, and has actually been dropped from recent Kali versions. I have heard tales of OSCP students’ notes getting corrupted and lost, which is not a good situation to face when you are paying for limited time to complete the coursework (and exam).

If you are starting down the PWK/OSCP path, you will soon realize that you will need to take a lot of notes. Not just on the course materials, but on every exercise you do and every machine in the lab that you work on. This includes screenshots, copy-pasted output from nmap and other tools, and the specific steps you took to conquer a box (and hopefully the steps that didn’t work, from which you can reference in the future).

It adds up quickly, and it’s a challenge to keep straight as you hack away at box after box in the lab. Being a person that has kept a keen eye on note taking apps in general, long before I got my OSCP, I have some recommendations, with pros and cons of each.

In no particular order (see my Recommendations at the bottom):

CherryTree

Learn more and download CherryTree here.

The Good

  • Hierarchical (pretty much unlimited depth)
  • Free, open-source software for Linux and Windows. You *can* get this to run on a Mac, but it’s buggy
  • Highly customizable through preferences and templates
  • Imports notes from tons of places, does some good exporting too

The Bad

  • Can’t paste images from the clipboard directly into notes
  • Not the greatest at embedding files in general
  • Not easily synced between devices/VMs
  • No Mac or mobile device support

CherryTree is like KeepNote in many ways, but it is has many more features and is actively maintained. If you are going to be solely storing and referencing your notes on one machine (your host or Kali VM), use this tool. The template feature is really awesome, and it lets you create a new note based on a template of your design. This means you could create a template for Lab VMs that you can quickly populate with data as you work on a given machine. You could do something similar for PWK exercises. It should make reporting much easier.

Evernote

Download Evernote here.

The Good

  • Feature rich app, integrates with Web Clipper browser extension
  • Windows, Mac, iPhone, Android native clients with web version for Linux
  • Is modern and hip, if that matters to you

The Bad

  • Costs $ if you want it to be any good. Free features seem to be waning as they push people into paying for the service
  • Lacks true hierarchical organization (uses tags instead of folders)

My struggles with Evernote have been well documented on this blog in the past, but some people still swear by it, so I thought I’d mention it here. They do make ease-of-access a priority, and you can get to your Evernote stuff from just about anywhere. Using it is easy until you need to organize things with any complexity, and for the PWK labs, you’d have to be OK with using the #tags instead of folders.

Microsoft Onenote

Download Onenote from Microsoft here.

The Good

  • Feature rich app, integrates with Onenote Clipper browser extension
  • Free Windows, Mac, iPhone, Android native clients with web version for Linux
  • Free version is not feature limited (just space, which hasn’t been a problem for me)
  • Excellent hierarchical organization via notebooks > sections > pages > sub-pages

The Bad

  • Some people feel it has a bloated interface
  • Exporting notes can pose challenges with formatting if you stray outside the pre-made lines

After many trials and tribulations, I ended up going all-in with Onenote for PWK/OSCP, and life in general. The ability to create multiple, separate notebooks (and choose which ones you want to see on which devices) has been my favorite feature. I can separate work from life from projects from shared stuff this way, and I still have a good amount of hierarchical ability to organize things.

Your Favorite Markdown Editor

I see people profess their undying devotion to markdown when the note-taking discussion comes up in various OSCP forums/chats, and I respect their decision and desire for simplicity. However, the one feature I used most, and I can’t imagine living without in the OSCP course, is the ability to paste a screenshot into a note. I did this so much that it would have driven me crazy to have to do anything else, and with markdown, you have to do some form of “save image/reference image via text in the note/embed via some other mechanism”. There are extra steps involved, and you can’t easily do the copy/paste thing.

Clippers/Screenshot Tools

Speaking of screenshots and the need to embed them in your notes, there are several options I would recommend depending on your choice of note taking apps and the platforms upon which you use them. Here are my top three:

  • Snap ‘n Drag Pro (Mac only). Awesome customization options, ability to edit captures (add arrows/highlight/blurs), automatically adds to clipboard.
  • Skitch – If you use Evernote, use this (unless you are on a Mac, see above)
  • Shutter – Native Linux screenshot app

For PWK, I found the Evernote and Onenote clipper browser extensions to be limiting in that they only let you clip things from your web browser, when I needed to clip terminal output most frequently.

My Recommendations

Because I am primarily a Mac user, I need good support for screenshot pasting, and I prefer hierarchical note structure for organization, I went with Onenote and Snap ‘n Drag Pro for my PWK and OSCP work. I continue to use these two tools in my personal and professional life, too.

If I were not a Mac user, I’d go with CherryTree and Skitch.

Have any opinions or additional input about all of this? Let me know in the comments.

Firefox Captive Portal Spam in Burp Suite

About a year ago, Mozilla added “captive portal” support to Firefox in an attempt to enhance usability when connecting to free WiFi portals, such as at an airport or a hotel. You have probably interacted with captive portals in the past, and if you are a Firefox user, you may have wondered why you had to open Chrome or IE or Safari to be able to log into the WiFi system, as you could only get the “Sign In” page to pop up in one of those browsers before getting access to the full Internet.

Firefox added support for these “Sign In” pages about a year ago, so that you don’t need to use a (shudder) different browser. That is all well and good, except for when it comes to using Burp Suite as a proxy for Firefox. If you are a pentester, you are probably used using Firefox (especially on Kali Linux) for your traffic proxying through Burp, as they make it easier than any other browser to set up and disable the proxy.

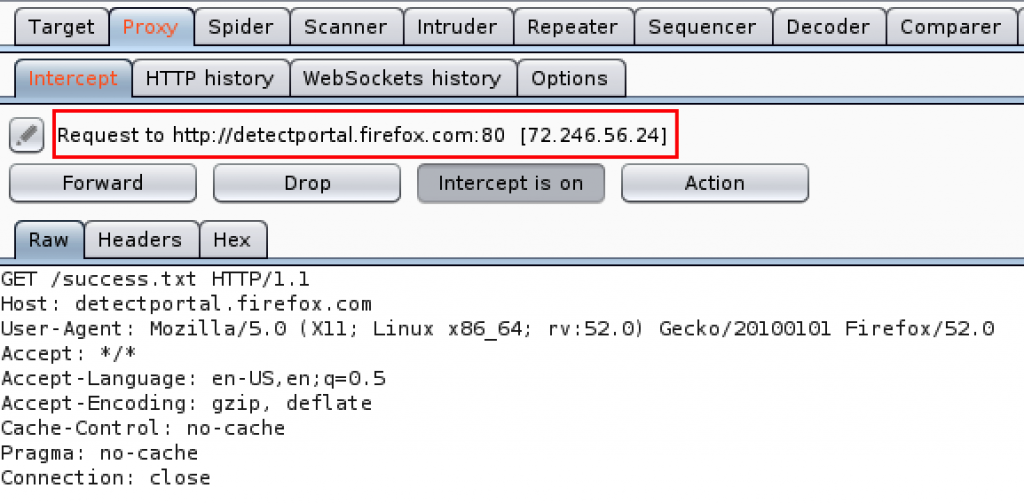
However, you may now be seeing a ton of requests like this:

Disable the detectportal.firefox.com requests

Seeing all those requests in Burp, much less thinking about all the noise they generate otherwise, is annoying. Because you probably won’t ever need to use a Captive Portal on your pentesting machine (a VM, in my case), you can completely disable Firefox’s attempts to detect them. Just browse to about:config and enter network.captive-portal-service.enabled. Double click it to change its value to “false” and you should be good to go.

That’s all, folks!


Tool Sharpening

As honest Abe Lincoln said, “Give me six hours to chop down a tree and I will spend the first four sharpening the axe.”

For the last six months, I have been playing the part of Hey Blinkin, getting the tools in my toolbox sharpened, honed, configured, and ready as I am inches away from starting the PWK/OSCP course. As soon as some paperwork clears, I’ll be signing up, hopefully to start in mid-July. You may have seen me posting things I’ve learned so far here on my blog. I intend to keep it up, as finding other OSCP adventurer blogs, tips, and tools along my journey has been invaluable. I hope to pay it forward here.

That said, here are a few very sharp tools I’ve come to love (as recently as this evening):

iTerm 2 – http://iterm2.com/ – a better Terminal app for Mac. Highly configurable, integrative, and versatile. Not exactly a pentesting tool, but something anyone doing command line work on a Mac should check out.

Sn1per – https://github.com/1N3/Sn1per – a super-thorough and invasive reconnaissance tool. It is very noisy and not recommended for actual pentesting, but it is great for working on CTF and Vulnhub VMs.

OSINT Framework – http://osintframework.com/ – a hefty, well-organized set of free tools for gathering all kinds of information. Originally geared towards security, it includes a lot of other fields as well. Follow it on GitHub here.


Microsoft Windows has Free Virtual Machines

Wish I had know about these earlier. Microsoft offers free Windows virtual machines for VirtualBox, VMWare, and others. You can choose from Windows 7, Windows 8, or Windows 10 (a few different flavors of each). They last 90 days before expiring, but you can snapshot them right after you install them to make it easy to reset that 90 days by rolling back to the snapshot.

Officially, these are for testing out the Edge browser, but you can also use them for whatever else 😉

Check them out here:

https://developer.microsoft.com/en-us/microsoft-edge/tools/vms/


We Cut The Cord!

cable tv photoAbout 3 weeks ago, we decided we were done paying Charter $120/month for the highest level TV package they had. When Rachael and I sat down to think about it, we realized that we really only care about a few things:

  1. College basketball (well, for me, anyway).
  2. HBO shows we like
  3. Jeopardy!

Everything else was peripheral, and we felt like we could live without it. We imagined more free time, more book reading, and more chances to talk to each other and interact amongst the family.

The New Way

I set out to find out the best way to go about this. After quickly discovering the Cord Cutters sub-Reddit, I was pretty well set. Here’s what we ended up with:

  • SlingTV account for $25/month (base package + extra sports channels). This covered most all of my college basketball needs, live CNN, and some other channels we don’t really care about.
  • HBONow through SlingTV for $15/month. While I signed up for this for one month, I think we may go to the HBONow version available through iTunes. That way, we can watch it on either of our AppleTV’s, of which we have two: one in the living room and one in the bedroom. The SlingTV app doesn’t provide for this. Either way, it’s $15/mo., and we can cancel it during the dry months when our favorite shows aren’t on.

That’s it for paid TV. We are at $40/month, and we will cancel Sling once college basketball season is over. That puts us at $15/mo for HBO.

What Else We Are Using

In order to use SlingTV decently, I hooked up my old Mac Mini to our main TV in the living room. I just launch the SlingTV app and we can browse through it with a wireless keyboard and mouse. This comes with the added bonus of doing whatever else we might do on a computer with the TV as the monitor.

I also found a website called USTVNOW.com that gives you all the broadcast networks for free. The local news is based in Philadelphia, but you get all the programming of ABC, CBS, NBC, Fox, and a few others. So we get Jeopardy!

USTVNOW.com does require you to be in another country, as it was geared towards US military and government people overseas to be able to get TV from the States. All I had to do was log in once from another country (thank you Tunnel Bear) and now it lets me in every time, at least until the browser cookie expires, but that is easily resolved.

We also have a Chromecast and the two AppleTV’s I mentioned before. The Chromecast makes it easy to watch Youtube or whatever we might have from another computer or a phone. The AppleTV’s let us watch Netflix ($9/mo) and we might sign up for Hulu ($8/mo).

Lastly, I found an AppleTV remote app, a remote mouse app, and a custom remote app for my phone that let me control my TV, AppleTV, and the Mac Mini, all from my phone.

Getting Used To It

The only qualms about all this have been some moments where the streams were jittery (especially USTVNOW during NFL playoffs), and not being able to channel surf the way we used to. However, we still get to watch the shows we like, I have yet to miss a Louisville basketball game, and the other benefits I mentioned have been working their way into our lives.

There have been some moments of frustration while we try to get used to this new way of life, especially during those “just want to veg out and channel surf” moments, but we are adapting, and realizing that there are better uses of our time.

Summary

We reduced our Charter bill significantly by going down to internet-only and ditching cable TV. It is 2/3 cheaper now!

Even if we pay for SlingTV, Hulu, Netflix. and HBONow all at the same time, we are still looking at less than half the cost of what we were paying to Charter.

This is an endeavor I highly recommend!

Photo by Mike Licht, NotionsCapital.com

NordVPN’s Bait and Switch

The old bait and switch: promise you one thing and sell you another. That’s what happened when I signed up for a year of VPN service through NordVPN. Their website said:

Easiest VPN Ever. To get on NordVPN, just click and go. NordVPN’s secure VPN software takes care of all the hard stuff so you can focus on fun stuff. And work stuff, if you have to.”

Their imagery showed multiple devices running their software, including phones and laptops.

I had read about their service and took the plunge. After I had paid, I found out they do not have an app for Mac OS X or Android. Those apps are supposedly coming soon, but not yet. For now, you have to download a third-party app for each device, download a bunch of configuration files, install said configuration files, configure a bunch of things, remember your username and password for each configuration file, and then figure out what is going on and whether or not you are actually connected.

To be fair, they do have instructions on how to do all of this, but it is far from “Easiest VPN Ever.” Every other VPN app I have used is a simple app you download and click a button to get going with.

I chatted with NordVPN’s technical support guy, “Dave,” who informed me that of their refund policy, which states that unless their product did not work for a fault of their own, I could not get a refund for my money. All he could do was extend my subscription by 3 months.

(01:30:40) David: if the service does not work we will issue a refund.
(01:31:17) Visitor 34392357: that is my point – it doesn’t work as you advertise it. it only works through a lengthy process of installing other software.

I would argue that their product does not work as advertised and I am entitled to a refund. In fact, it’s not even their product I am using — I am using something called “Tunnelblick” on my Mac, and an app called OpenVPN on my Android phone to connect to the NordVPN servers.

In summary, the bait was the promise of an easy to use VPN app. The switch was not even having an app for me to use. And no matter what VPN you will choose, be sure to run a speed test so you can see if your VPN is slowing down your internet speed.

Snagit Charges for “Upgrade”

lipstick on a pig photo
Look! This pig has lipstick.

I am completely fine with paying for software that I really like and that serves a purpose for me. However, if you are a software company that is going to use the ‘paid upgrade’ model of charging customers to upgrade to the next major version of your product, make sure the next major version contains new features worth paying for.

In the case of TechSmith’s Snagit, they have failed to provide anything of real value in their latest release (version 3.0 for Mac, or 12.0 for Windows), yet they are asking for $24.95 to upgrade to the latest version.

I paid for version 2 of Snagit for my Mac (that’s version 11 for you Windows users), and I really enjoyed using it. It became a tool in my arsenal that I relied heavily upon for doing quick screen shots and adding text, notes, arrows, and more.

Then one day a couple of weeks ago the updater ran and I was suddenly looking at a trial version of Snagit 3.0. And it said it was going to expire unless I paid the discounted upgrade fee of $24.95.

Aggravated, I hoped to have my mood changed and be wowed by version 3.0. So I tested it out for a few days. I quickly found that it had a nicer look and feel about it, but other than that, there were no noticeable enhancements or actual upgrades to the product. It was the same product with about one new feature related to the video clipping tool — something I could care less about. And that new feature was only a new arrow selector of some sort. Not impressed.

Jason Eagleston, the “Snagit Product Owner” at TechSmith even admits in their self-congratulatory release video that “with this release we had a focus on updating the way Snagit looks and feels, partially to bring that consistency across all the Techsmith things that you are going to interact with, but ultimately it’s only focused on getting your content to be the most prominent thing on the screen.”

Hmm…I only interact with one Techsmith product, so why should this be a feature worth paying for? And how is it not the most prominent thing on my screen if I’m currently using it in the first place?

A couple of more employees in the video go on to talk about how much nicer the product will be to use, and that they really wanted people to feel like they were using something current and not outdated. So it really isn’t about an upgrade, it’s about a change of clothes.

The whole video is about them admitting that their product didn’t look that great, so they spent a lot of effort making it look better (or “flatter,” as they say in the video, which is supposed to be something we should like), and now they want their customers to pay for that. No real tool enhancements or additions, just a subjective improvement to the design. For $24.95? No thanks.

For those of you looking for a free alternative to Snagit, check out Skitch. With or without Evernote, it’s a nice tool that does just about everything Snagit does for screen capturing.

Photo by Darin Barry

clicky